2JZ Swap – Everything You Need To Know
The Nissan 240SX is an incredible chassis, but that’s not the case for its powerplant. So here’s how to unleash its potential with a 2JZ swap upgrade.
- Introduction
- Initial 2JZ Swap Considerations
- 2JZ Swap Cost
- USDM vs JDM 2JZ-GTE Engine Differences
- 2JZ Swap Kits
- Parts Needed For A 2JZ Swap
- What’s Next?
Introduction
Whether you know it is the Nissan 240SX, S13, or 180SX, there’s no disputing that this legendary chassis has stood the test of time as it continues to capture podiums across a wide array of motorsport disciplines more than thirty years after its launch.
While the JDM and European S13/180SX models were gifted with the high-revving CA18DET and SR20DET turbocharged engines under the hood, it wasn’t the case for the USDM-derived 240SX.
Although the 2.4-liter displacement may sound more impressive than the 1.8-liter CA and 2.0-liter SR engines, it turns out that there is (beyond popular belief) a replacement for displacement in the s-chassis offerings!
While the SR20DET was earning its status as a legendary JDM powerplant, the 240SX’s KA24DE was fitted to the likes of Nissan’s Frontier and Xterra.
With the KA24DE providing between 134-155hp, alongside 152-160lb/ft torque across the various models, it’s easy to see why so many 240SX owners began giving up on the stock engine in favor of superior offerings.
Sure, there are ways to push the KA24DE to its limits with the like of a turbo upgrade.
However, for those looking to go beyond the 400hp mark, it makes more sense to opt for an alternative engine from the start, and one that’s known for frequently pushing out four-figures on the dyno is always going to be a tempting prospect.
Although the more common 240SX swap choice is to stick with the Nissan badge, opting for some of their best engines, such as the RB20DET and RB25DET, or even the RB26DETT, we’re instead turning to Nissan’s main rival in this guide – Toyota.
Let’s face it; even if you’re a die-hard Nissan fan, it’s hard not to have respect for Toyota’s most impressive engines.
While the 1JZ-GTE is certainly no slouch, it’s the 2JZ-GTE that’s the true tuner king.
Don’t believe us? Here’s a 1,200hp AWD 2JZ-swapped 240SX with a ridiculous 0-60 time of just 1.4 seconds!
Now that we’ve got your attention, let’s look at what you’ll need for your 240SX 2JZ swap.
2JZ Swap Considerations
Much like when it comes to carrying out an engine swap in your top drift games, it’ll come as no surprise that your first consideration will be what car you’re planning to carry out your 2JZ swap on.
While the options in this guide will apply to many vehicles that you could potentially consider for a 2JZ swap, we’ll be explaining what is required to build the ultimate 2JZ-powered Nissan 240SX/180SX/S13.
Sourcing The Ideal 2JZ Swap Candidate
To begin, we’ll assume you’ve already got yourself an s-chassis. If not, it may be worth considering whether you wish to opt for a 180SX or 240SX chassis.
Thanks to the 180SX now falling within the US 25-year import rule, you have the option to import a JDM 180SX into the US.
However, unless you have bottomless pockets, it’s likely to be more viable to try and find yourself a 240SX in the US.
Although the days of picking up a 240SX at the local junkyard for a steal are likely to be over, looking out for a 240 with a blown motor will be your best chance of finding an ideal candidate for your 2JZ swap.
Even if it’s a high-mileage chassis, we wouldn’t be too put off – our primary consideration, in this case, would be whether it has significant rust. If so, it may be worth holding out for a better example.
Many of you are likely to have got inspiration from ThatDudeinBlue’s 2JZ-swapped 240, but did you know that it had already racked up 240,000 miles before deciding it would make an ideal candidate for a 2JZ transplant.
After initial teething problems with his build, he opted for a single-turbo setup, reaching full boost at 3,300 rpm and eventually pushing out 509 hp and 470lb/ft torque. With that in mind, opting for a single-turbo may be an ideal early consideration.
2JZ Swap Cost
It’s no secret that the 240SX/180SX chassis and 2JZ-GTE have escalated in price dramatically in recent years.
Prices will vary immensely, from the initial cost of the engine, to whether you intend to undertake the 2JZ swap or whether you need to consider paying out for labor.
On top of that, many unique or custom 2JZ swap parts to consider, many of which aren’t easy to pick up second-hand.
Carrying out a 2JZ swap will cost somewhere in the region of $7,000-20,000, depending on many factors. Carrying out as much work as possible yourself will keep the cost to a minimum.
It’s worth noting that this isn’t a simple swap and certainly isn’t something we’d consider taking on for a beginner’s project car, who might only have minimal knowledge.
As prices continue to rise with increased demand for the already-rare 2JZ-GTE engine, many will also consider the 1JZ-GTE as the powerplant of choice for their engine swap.
Another option would be turbocharging the naturally-aspirated 2JZ-GE engine or even going down the 1.5JZ route.
USDM vs JDM 2JZ-GTE Engine Differences
There are some differences between the USDM and JDM 2JZ-GTE engines, which are worth considering before your swap.
The JDM engine is often more accessible to source, given that your only real chances of getting a USDM model are from a wrecked 2JZ MKIV Supra, and with the ever-growing prices, that’s increasingly unlikely.
Although many enthusiasts believe they’re identical engines, there are some significant differences between them.
USDM vs JDM 2JZ-GTE Turbochargers
For the USDM models, they opted for stainless steel CT12A turbochargers, while the JDM models use ceramic-constructed CT20s.
Although the JDM turbos are superior for minimal turbo lag, they’re known for being less reliable, and when they break down, it’s far from ideal.
Given the scarcity of the USDM turbochargers, it’s easy to see why so many opt for a single-turbo setup, which provides a far more extensive off-the-shelf choice.
USDM vs JDM 2JZ-GTE Injectors
Although the stock injectors are a straight physical swap between the two variants, with both being Denso side feeds, the plug is different.
Alongside this, the impedance and flow rates are also unique, with the JDM engine using 440cc (high impedance) injectors and the USDM using 550cc (low impedance.)
If you wish to swap between the stock injectors found in USDM and JDM 2JZ engines, you’ll need to use a resistor pack for the USDM injectors since they’re low impedance.
USDM vs JDM 2JZ-GTE Camshafts
The USDM engine has a slightly superior, more aggressive cam profile of the two.
USDM vs JDM 2JZ-GTE EGR
While the JDM engine doesn’t have EGR (Exhaust Gas Recirculation), the USDM engine does.
USDM engine owners can choose to use the EGR delete kits available on the market if they wish to get rid of this, and JDM owners can drill out the head if they want to install this, which is pre-tapped for bolts.
USDM vs JDM 2JZ-GTE AFM/MAF
The USDM 2JZ runs off the AFM/MAF and map. However, the JDM equivalent is map-based, without AFM.
USDM vs JDM 2JZ-GTE Water Pump
The JDM 2JZ-GTE water pump found on the Toyota Aristo has an extra coolant port due to its hydro-fan setup, which requires a hydraulic pump to power the radiator fan, unlike the USDM variant.
However, the JDM and USDM 2JZ’s found in the Toyota Supras use the same water pumps.
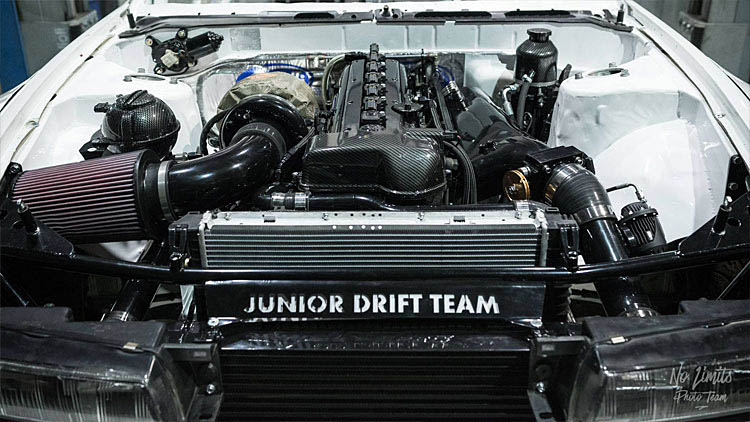
2JZ Swap Kits
If you want to make your 2JZ swap as convenient as possible, purchase a swap kit, such as the Tech 2 Motorsports 2JZ swap kit, which provides a suitable off-the-shelf alternative to doing everything yourself.
With this kit, you can drop a 2JZ or 1JZ into your 240SX S13 without altering the chassis.
The kit houses the engine as far back as possible in the bay and conveniently places the shift knob in the factory location when using an R154 5-speed box. They also have custom parts available to suit your needs if you intend to use a V160 6-speed or automatic alternative.
Alternatively, if you’re handy with a welder, you can modify the OEM Soarer/SC/Aristo mounts and your cross member to replicate the kit. However, we’d personally save the time and hassle and go with the tried-and-tested method that has been on the market for some time.
Parts Needed For A 2JZ Swap
If the thought of carrying out your 2JZ swap is looking a little intimidating at this point, don’t panic.
ThatDudeinBlue (with some help from his friends) shows how you can fit a 2JZ to your 240SX in just over 10 minutes. How hard can it be?
Jokes aside, the reality is that it’s a fair bit more challenging than they made it look, but don’t let that put you off!
Regarding the parts you’ll need for your 2JZ swap – some will be essential, while others will be optional depending on how much cash you’ve got to spend and how perfect you want the end product to be.
It’ll be no surprise that if you’re building a 2JZ drift missile, you can expect it to come in quite a bit cheaper than a stunning show car.
Before we get started, here’s a helpful video round-up of the parts you’re going to need to carry out a 2JZ swap on your 240SX:
However, continue reading if you’re after a list of the parts required, as we take a deep dive into everything you’ll need to consider for your 2JZ swap, tailored for the 240SX, but will also apply for 2JZ swapping in an array of other vehicles.
At this point, we highly recommend deciding whether it will be in your best interests to hire a professional to carry out your 2JZ swap. Still, for those likely to be competent in doing so, we hope this information will provide you with everything you need.
One primary consideration when choosing a 2JZ-GTE engine for your build, a front-sumped 2JZ is the better option.
However, if you’ve already sourced a rear-sump 2J, you’ll need an oil pan, oil pick-up, and windage tray from a front-sumped engine to fit the 2JZ correctly.
2JZ Engine Swap Mounts
Although some will prefer to make custom mounts for their 2JZ swap, here are some of the most popular alternatives.
For the most convenient, off-the-shelf option, we recommend these ISR Performance 240SX JZ Swap Mounts.
An alternative option is these 3/8” lowering mounts.
2JZ Swap Wiring Harness
If you speak to anyone that has previously carried out a 2JZ swap, the wiring harness is likely to be a sensitive subject!
As you’ve probably guessed, combining wiring from a Nissan with an engine from a Toyota isn’t the simplest of tasks, and this is where many will hit a brick wall with their progress.
Unfortunately, finding someone qualified enough to trust with the complicated process for a reasonable price is still somewhat of a gamble. The last thing you want is to pay out big bucks, only to experience even more issues further down the line.
Thankfully, Wiring Specialties have come to the rescue, providing a tried-and-tested off-the-shelf wiring kit that has answered many 2JZ swappers’ prayers.
All you need to do is select your option below to purchase the ideal wiring kit for your needs:
- Wiring Specialties 2JZGTE PRO-SERIES Wiring Harness for S13 240sx
- Wiring Specialties 2JZGTE NON-VVTI PRO-SERIES Wiring Harness for S14 240sx
If you wish to do the job yourself, we recommend downloading the Aristo/Supra 2JZ wiring schematics. Since plenty of forums and Facebook groups provide knowledgeable support, this may be the most reasonable option for your budget.
Wiring is our worst nightmare, so we certainly know which route we’d be choosing!
2JZ Swap Transmission
There are several options when choosing a manual transmission for your 2JZ swap.
While the R154 is typically the go-to choice, they’re far from the cheapest. Unfortunately, given the rarity, prices will only continue to climb.
If you opt for an R154, the JZX100 box is the most desirable since the shifter will be in a perfect position for the 240SX.
Alternative gearboxes include:
- Toyota R154 (JZX100 preferable)
- Toyota Supra V160
- Nissan 350Z CD009
- A variety of BMW gearboxes
Given that most gearbox options are substantially bigger than the stock 240SX/180SX offerings, you’ll either want to get carried away with a hammer in your transmission tunnel or go with this Weld-in Transmission Tunnel Clearance kit.
2JZ Swap Transmission Mount Bracket
If you’re going down the R154 or W58 route for your transmission, we recommend this Xcessive 1JZ & 2JZ Transmission Mount Bracket. You can also consider the Urethane Transmission Mount.
Alternatively, for the Nissan VQ 6-speed (CD009) transmission, the Xcessive 1JZ & 2JZ Transmission Mount Bracket will be a perfect choice.
2JZ Swap Intercooler
Since you’re already going through the effort of a 2JZ swap, we recommend going for a front mount intercooler setup simultaneously, which will become essential beyond around 350 hp.
If you’re looking for a complete off-the-shelf kit, then the ISR Performance 240SX 2JZ Front Mount Intercooler will be the perfect option.
Alternatively, if you’d prefer a custom setup, you can also buy the piping kit separately.
2JZ Swap Exhaust Manifold and Downpipe
At this point, you’ll need to decide whether you’re going for a single turbo or twin-turbo setup.
For a single turbo setup, there are plenty of kits available on the market. Most universal downpipes will fit, but the manifold/headers can be a little more complicated, so it may be worth considering going down the custom route.
If you’re using the JDM factory twin-turbos, it’s recommended to go with a JDM JZA80 02 housing or cat delete. However, with the USDM twins, most off-the-shelf downpipe kits will be fine.
If you’ve got the budget, while these parts are off the car, we highly recommend heat-wrapping to ensure their longevity.
2JZ Swap Exhaust
You’ll be glad to hear that sourcing an exhaust is one of the most convenient parts of your swap.
You can choose from any of the awesome 240SX exhausts on the market.
You will need to modify the exhaust slightly to make a cross-over pipe from the downpipe to the cat-back, but it’s easy enough to do yourself or get it done cheaply at most fabricators.
2JZ Swap Fuel Pump
The Walbro 255 fuel pump is the go-to choice for 2JZ swaps unless you’re going for wild horsepower figures.
Alternatively, you can also use the factory Supra twin-turbo fuel pumps, which Denso or Bosch manufactures, but you’ll need to go down the custom route to get them to fit.
We’d save the hassle and go with the convenient, tried-and-tested Walbro.
2JZ Swap Radiator
Although we’ve seen some builds keep the stock 240SX radiator setup, we feel that upgrading the cooling is essential.
With its aluminium cylinder head, the 2JZ is prone to warping at temperatures beyond 210 degrees, which will NOT be fun.
A preferred choice is a slimline three-row Koyo (or similar) quality aluminum rad, fan shroud, and a custom oil cooler setup.
KA24DE radiators fit, but you’ll need to chop a few inches off the upper radiator hose for the 2JZ to make it work. SR20DET rads are also an option alongside the 2JZ upper and lower hoses. Alternatively, you can get an off-the-shelf 2JZ swap coolant hose kit.
Remember to opt for the slimmest radiator possible, as you’ll need all the room you can get to fit the 2JZ in the already snug bay.
2JZ Swap Electric Fans
You’ll once again want to find the slimmest fans you can here. Flex-A-Lite models 410 or 420 are up there with the best.
2JZ Swap Gauges
There are options if you wish to use your 240SX speedo/tach interface. For example, you can get a magnetic pick-up coil when running an R154 or V160 setup.
Alternatively, there are plenty of custom gauge options on the market, with some being pretty damn funky if you’ve got the budget.
Although it’s one of those things that most of us would rather not spend money on, high-quality gauges can often save your engine.
Buying the cheapest gauges that deliver false readings could cause drastic consequences without you realizing it until it’s too late.
We feel that a water temp gauge is vital due to the increased temps of the 2JZ. For us, Oil Temperature, Boost Gauge, AFM, and Oil Pressure would also be essential.
If you’ve got the budget, you can light your 240SX up like a Christmas tree at night, but we’d recommend playing it sensibly with these essentials until the build is complete, as it can get expensive very quickly!
2JZ Swap Pulley Kit
If you opt for the USDM water pump, you’ll need to get a new water pump pulley. You can opt for the OEM pulley. Or, GReddy makes aftermarket pulley kits, and various other alternatives are available.
Additional Considerations For Your 2JZ Swap
Once you’ve covered the essentials, you’ll need to consider plenty of additional parts for your 2J swap, many of which you’re likely to forget completely.
Here are some of the remaining parts you’ll also need to consider:
- Clutch release hub kit
- Coilpack conversion kit
- Coolant overflow tank
- Drive-by-wire delete kit
- Driveshaft
- Flywheel & bolts
- Fuel and oil pressure sensor
- Fire sleeve
- Fuel lines
- Fuel pressure regulator (FPR)
- Fuel rail
- Head studs
- IAT sensor
- Idle Air Control Valve (ACV)
- Inline fuse
- MAP sensor
- Oil catch can
- Oil cooler kit
- Oil sandwich plate
- Power distribution block
- Power steering line kit
- Radiator fan relay
- Short exhaust studs
- Swaybar
- Throttle cable bracket
- Toyota FIPG (RTV)
- Turbo oil feed/return
- Turbocharger
- USDM water pump
- Various lines
- Wastegate
- Wideband gauge kit
What’s Next?
We hope that all of the information above has been an enormous help in understanding what a 2JZ swap entails, and once you’ve finally got your 2JZ-powered 240SX ready to rip up the track, there are a few things you might want to consider upgrading.
With the impressive new power gains you’ve achieved, your brakes and suspension will undoubtedly benefit from an upgrade if you haven’t done so already.
For those intending to participate in the various motorsport disciplines that your 240SX will now be more than capable of, a roll cage is also likely to be a good idea.
If you’re looking to get the show to match the go, you may want to consider a over fender kit, or why not go with a complete Rocket Bunny kit?
If you’re looking for further information on carrying out your 2JZ swap, a wealth of online knowledge will help you on your journey.
In the meantime, we wish you luck – and don’t forget to share your builds with us when you’ve finally got it up and running. Bonus points if you’re shredding tires!
Thank you for reading our 2JZ Swap guide.
If you enjoyed this article, please share it with the buttons at the bottom of your screen. If you’ve found this information useful, then please take a moment to share it with other 2JZ enthusiasts. We appreciate your support.